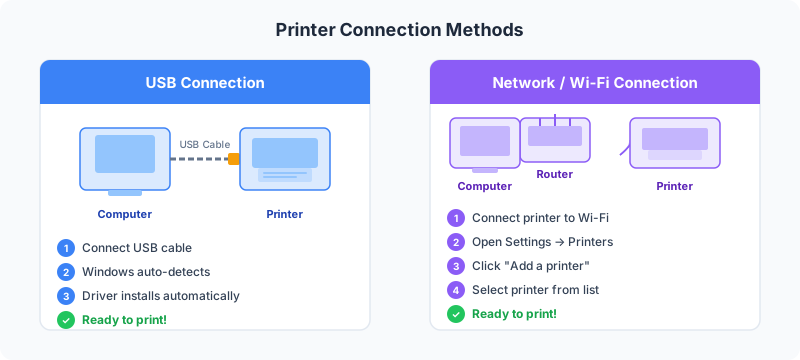
Installing a printer driver correctly is the foundation of a working printer setup. This guide walks you through every method — from the simplest plug-and-play to fully manual installation — and shows you how to fix the most common problems.
Before You Start
Before installing, gather the following information:
| What you need | Where to find it |
|---|---|
| Printer model number | Label on the front or bottom of the printer |
| Windows version (10 or 11) | Settings → System → About |
| System type (32-bit / 64-bit) | Settings → System → About → System type |
| Connection type (USB or Wi-Fi) | Decide before you begin |
Method 1 — USB Plug-and-Play (Easiest)
This works for most modern printers right out of the box.
Steps:
- Make sure the printer is powered off.
- Connect the USB cable from the printer to any USB port on your computer.
- Power the printer on.
- Windows will automatically detect the printer and download the driver.
- Wait for the notification: “Device is ready” in the bottom-right corner.
Tip: Use a USB cable shorter than 3 metres. Longer cables can cause connection errors.
Method 2 — Windows Settings (USB or Network)
Use this method if plug-and-play did not work, or to add a network printer.
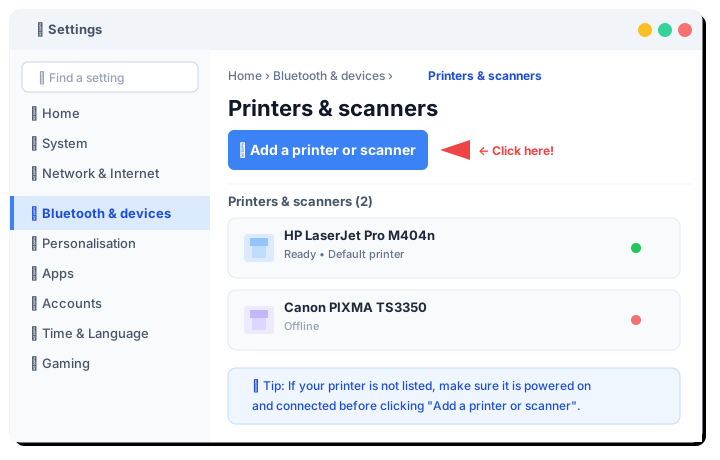
Steps:
- Open Start → Settings (⚙ icon).
- Click Bluetooth & devices → Printers & scanners.
- Click Add a printer or scanner (blue button at the top).
- Windows will scan for nearby printers. Wait 20–30 seconds.
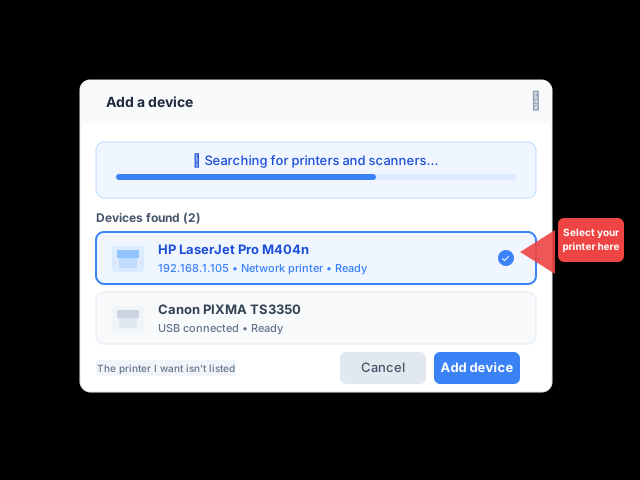
- When your printer appears in the list, click it to select it.
- Click Add device.
- Windows installs the driver automatically. The printer is added to your list when complete.
Network printer not appearing? Make sure the printer and your computer are connected to the same Wi-Fi network.
Method 3 — Manual Driver Download
Use this when Windows cannot find the driver automatically, or when you need the full-featured driver with scanning and fax support.
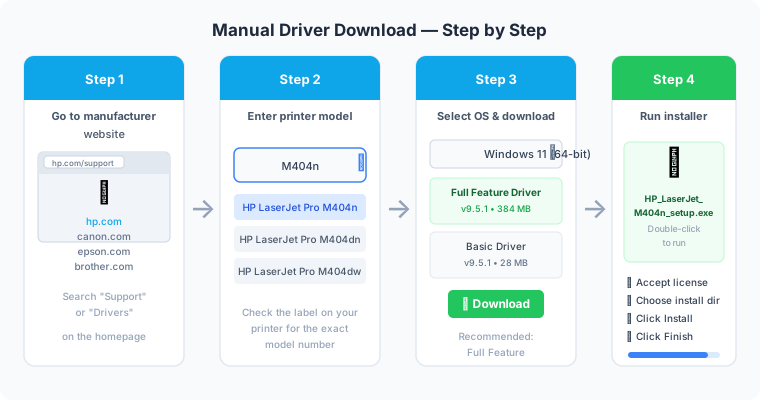
Steps:
- Find your printer model — check the label on the printer.
- Go to the manufacturer’s support website:
- HP:
support.hp.com - Canon:
canon.com/support - Epson:
epson.com/support - Brother:
support.brother.com
- HP:
- Search for your exact model number (e.g. LaserJet Pro M404n).
- Under Software and Drivers, select your operating system.
- Download the Full Feature Driver (recommended) or the Basic Driver.
- Open the downloaded
.exefile and follow the on-screen installer.
Which driver to download?
- Full Feature Driver — includes all software (scanner, fax, printer utility). Larger file (~200–400 MB).
- Basic Driver — print only, minimal install. Smaller file (~20–50 MB).
Method 4 — Network Printer via IP Address
Use this when your network printer is not discovered automatically.
Steps:
- Print a Configuration Page from the printer’s own control panel (usually: Settings → Reports → Configuration page). This shows the printer’s IP address.
- Open Settings → Bluetooth & devices → Printers & scanners → Add a printer or scanner.
- Click “The printer that I want isn’t listed”.
- Select “Add a printer using an IP address or hostname” → Next.
- Enter the printer’s IP address (e.g.
192.168.1.105). - Click Next — Windows will connect and install the driver.
Troubleshooting
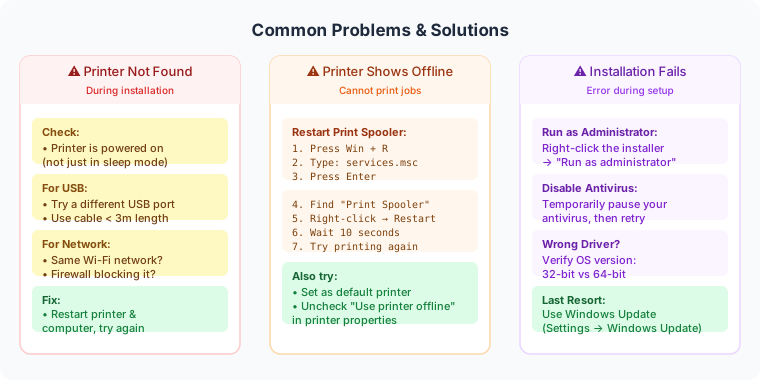
Printer Not Found During Setup
- Check that the printer is powered on (not in sleep/power-save mode).
- For USB: try a different USB port; avoid USB hubs.
- For network: confirm both devices are on the same Wi-Fi network.
- Temporarily disable your firewall and retry.
Printer Shows “Offline”
This is one of the most common issues. To fix it:
- Press
Win + R, typeservices.msc, and press Enter. - Scroll down to Print Spooler.
- Right-click → Restart.
- Open Devices and Printers, right-click your printer → See what’s printing.
- In the menu, click Printer and uncheck Use Printer Offline.
Driver Installation Fails
- Right-click the installer → Run as administrator.
- Temporarily pause your antivirus software, then retry.
- Make sure you downloaded the driver for the correct OS version (64-bit vs 32-bit).
- As a last resort, use Windows Update: Settings → Windows Update → Check for updates.
Printer Prints Blank Pages
- Open the printer’s software and run the Print Head Cleaning utility.
- Check that the ink or toner cartridges are properly seated.
- Make sure you removed all protective tape from new cartridges.
Summary
| Method | Best for | Driver source |
|---|---|---|
| USB Plug-and-Play | New printers, quick setup | Windows Update |
| Windows Settings | USB or network printers | Windows Update |
| Manual download | Full features, failed auto-install | Manufacturer website |
| IP address | Network printers not auto-detected | Windows / Manufacturer |
After installation, always print a test page: right-click the printer in Settings → Printer properties → Print a test page.
If you still have problems after following all methods, check the manufacturer’s support website for your specific model — they often publish dedicated troubleshooting guides.